

Table of Contents
- What You'll Need Before You Start Packing
- How to Pack Optics for Backcountry Hunting: Step-by-Step
- The Best Bino Harness for Backcountry Hunting
- How to Carry a Tripod While Hunting
- Emergency Repair Kit for Optics in the Field
- Packing for Specific Terrain: Micro-Climate and Weight-to-Utility
- Common Mistakes to Avoid When Packing Optics
- Conclusion
- Frequently Asked Questions
Last Updated: September 11, 2026
What You'll Need Before You Start Packing
Packing optics for backcountry hunting comes down to one problem: your binoculars and spotting scope are the most fragile, most expensive gear you carry, and they're useless if they're buried when you need them. The fix isn't more padding. It's a system where protection, access, and weight balance work together.
This guide covers the full setup, from lens covers to tripod carry to the repair kit that saves a hunt, how to pack optics so they survive the truck ride, the horse string, and the slide down a shale chute.
Gather these before you start:
- Binoculars and a spotting scope, if you run one
- A bino harness with a closed lid, not an open pouch
- Lens caps and a microfiber cloth in a zip bag
- A lightweight tripod with a quick-release plate
- Your multi-day backpack, loaded with everything except optics
- A small repair pouch: hex keys, spare lens cap, electrical tape, a few zip ties
The U.S. Forest Service publishes backcountry ethics and land-use guidance worth reading before a western hunt, and it applies to how you travel with gear on public land. U.S. Forest Service backcountry and wilderness guidance
How to Pack Optics for Backcountry Hunting: Step-by-Step
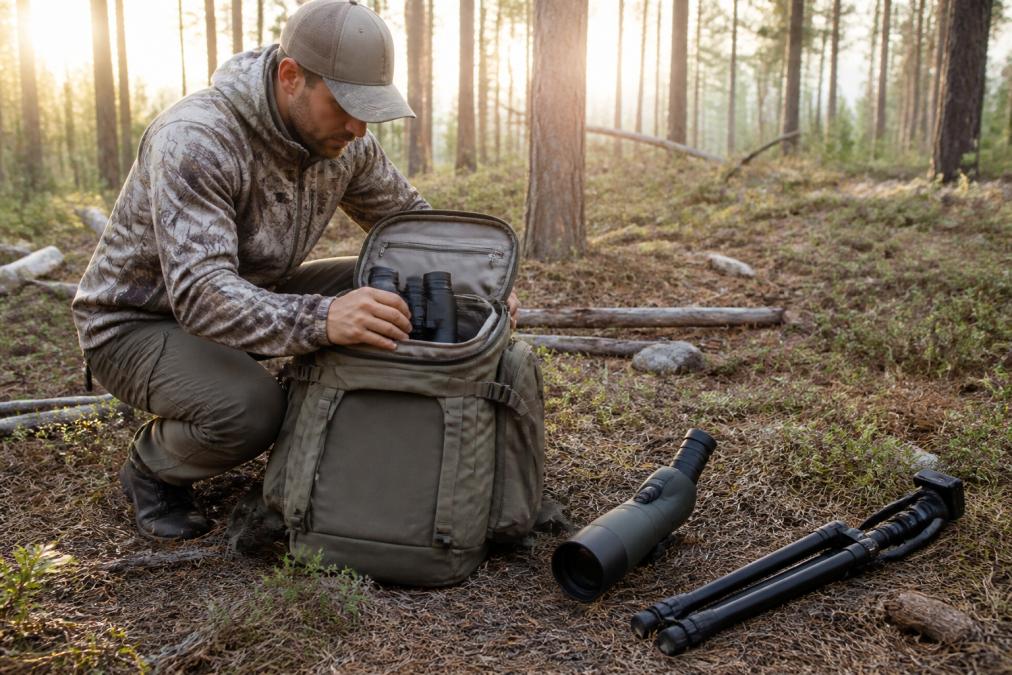
The short version: lenses covered, glass on your chest or in the lid, tripod strapped to one side, and the heavy end of the load high and close to your spine. Here's the reasoning behind those four moves.
Step 1: Protect the Objective and Eyepiece Lenses
Objective lenses and the eyepiece take the abuse because they face outward and collect grit. Keep caps on whenever the glass isn't at your eyes. A scratched objective lens scatters light and cuts long-range clarity in low light, exactly when animals move (peer-reviewed research).
Wipe with a microfiber cloth, never a shirttail. Sand ground into fabric will grind a coating off in one pass. If you're hunting in blowing dust or wet snow, consider a scope cover that seals rather than a stretchy sock.
Step 2: Build a Quick-Access Glassing Setup
Quick-access glassing means the binoculars ride on your chest in a harness, not in the pack. You'll glass dozens of times a day, and every unzip costs you minutes and makes noise.
A closed-lid harness keeps debris out while still opening with one hand. Keep a small cloth in the harness pocket so you can clear fog or dust without digging through your pack.
Step 3: Balance Weight Distribution in Your Pack
Weight distribution decides whether a 40-pound pack feels like 40 or 55. Optics are dense and small, easy to place badly. Put the spotting scope high and centered against your back, just below the shoulder blades.
Offset weight to the opposite side of your tripod so the load doesn't pull one shoulder down. Load management is a feel thing, but the rule holds: heavy items high and close, light bulk low and outboard.
| Pack Zone | What Goes There | Why |
|---|---|---|
| Top lid or chest harness | Binoculars, rangefinder | Instant access, protected |
| Upper back, centered | Spotting scope, heavy food | Keeps mass near spine |
| Side, opposite tripod | Water, kill kit | Offsets tripod weight |
| Bottom | Sleeping bag, camp layers | Light bulk, rarely needed |
The Best Bino Harness for Backcountry Hunting
The best bino harness for backcountry hunting is a closed-lid chest rig that holds the binoculars tight against your sternum, opens one-handed, and carries a rangefinder and a small cloth without adding bulk. Fit matters more than brand. A harness that bounces on a downhill will rub your neck raw by day two.
Look for these features:
- A lid that closes fully, so debris and snow stay out
- Adjustable side straps that pull the glass flat against your chest
- A front pocket sized for a rangefinder or a lens cloth
- Enough clearance to wear over a shell without pinching
If you run 20x50 binoculars, check that the harness pouch is deep enough. Compact 8x or 10x glass fits almost anything. Full-size 50mm objective lenses need a taller pouch, and a harness that's too short will let the glass flop forward on a steep descent.

How to Carry a Tripod While Hunting
A tripod is the heaviest single piece of glassing gear you carry, and the one most likely to snag, rattle, or throw off your balance on a sidehill. Carry it vertically on one side of your pack, head down, legs collapsed, or horizontally across the bottom in brushy terrain. Vertical keeps your profile narrow in timber; horizontal keeps branches off the head.
Two practical notes. First, wrap the head in a cloth or a small stuff sack so it doesn't rattle against the frame. Second, use two straps, not one. A single strap lets the tripod swing, and a swinging tripod will find every rock on the mountain.
Mount the Scope Before You Strap the Tripod, Not After
If you run a spotting scope on the tripod, take the scope off before you strap the tripod down. A mounted scope turns a light tripod into a top-heavy lever that catches limbs. Mount it again at the glassing point. Leave the quick-release plate on the scope, not the tripod, so you're only turning one knob in the cold.
Check the plate screw torque before the season. Most 1/4"-20 plate screws want 15-20 inch-pounds (fastenal.com). Over-tighten and you strip the insert in the scope foot; under-tighten and the scope shifts zero on a stalk. A hex key in your repair pouch handles this in the field.
Balance the Load Around the Tripod
A tripod carried on one side pulls that shoulder down over a long day. Offset it with water, kill kit, or heavy food on the opposite side. The goal is a load that hangs level when you stand still. If one shoulder rides lower, move weight, don't just tighten a strap.
When to Leave the Tripod Behind
A tripod plus a spotting scope is a real weight penalty, on some hunts it earns its place, on others it doesn't.
Run the math on your own hunt:
- High-alpine, open basins, long glassing sessions: the tripod earns its weight. You'll deploy it multiple times a day and the stability is the difference between counting points and guessing.
- Dense timber, close-quarters still-hunting: leave it. You'll glass with binoculars off your chest and never set the tripod up. That weight is better spent on water.
- Mixed terrain: carry a light tripod and a compact spotter, or carry the tripod and leave the spotter. Carrying both plus a second tripod is where packs get heavy for no return.
A simple rule: if you can't name three spots on the map where you'll actually set the tripod up, it stays home. Most hunters carry one set of glass, one tripod, and a repair pouch. That's the whole kit.
If you're building the full glassing setup from scratch, the Hunter's Optics Kit bundles a rangefinder, rifle scope, and binoculars so you're not piecing it together one item at a time.

🛒 Shop the Hunter's Optics Kit →
Emergency Repair Kit for Optics in the Field
An optics repair kit is small, cheap, and the difference between finishing a hunt and driving home. Most field failures aren't broken glass. They're a lost lens cap, a stripped mounting screw, or a strap that pulled loose.
Build a pouch with:
- Two hex keys sized to your tripod plate and scope rings
- A spare objective lens cap
- A small roll of electrical tape
- Three zip ties
- A strip of duct tape wrapped around a pencil stub
- A microfiber cloth in a zip bag
Electrical tape fixes a cracked cap well enough to finish the trip. Zip ties replace a broken harness strap. Hex keys tighten a loose mount before the scope shifts zero on a stalk. This pouch weighs almost nothing.
Packing for Specific Terrain: Micro-Climate and Weight-to-Utility
Terrain changes how you pack. Two things drive your packing decisions: the micro-climate you're moving through and the weight-to-utility math of every piece of glass you carry.
Micro-Climate Protection: Fogging and Condensation
Glass that goes from a warm tent to cold air fogs, warm, moist air inside the optic meets a cold lens surface and condenses. A sealed case traps that moisture and makes it worse. Let optics breathe when you stop, and store them with a desiccant pack in wet country.
Micro-climate protection means thinking about the ten feet around you, not the forecast. A shaded north slope holds moisture long after a sunny ridge dries out. If your route crosses both, keep the glass in the harness where air moves, not sealed in a wet pack.
The bigger risk is internal fogging. If moisture gets inside the optic and the temperature swings, it fogs on the inside of the lens where you can't wipe it. That's a hunt-ender. Prevention is the fix: never store wet optics in a sealed case overnight, and give them air at camp.
Packing for High-Alpine vs. Dense Timber
The same kit packs differently depending on where you're hunting.
- High-alpine and open basins: you'll glass from fixed points for long stretches. The tripod and spotting scope earn their weight. Pack them where you can deploy fast, tripod on the side, spotter in the top lid or a side pocket, not buried. You'll also deal with wind and temperature swings, so keep a lens cloth and a desiccant pack in the harness.
- Dense timber and close-quarters country: you'll glass with binoculars off your chest and rarely set up a tripod. Leave the spotter home. Pack light, keep the profile narrow, and put the weight you save into water or layers. A tripod in thick timber is dead weight you'll fight all day.
- Mixed terrain: carry a light tripod and a compact spotter, or the tripod and no spotter. Carrying both plus a backup is where packs get heavy for no return.
Weight-to-Utility: The Framework
Weight-to-utility is simple math: divide a piece of gear's weight by how many times you'll actually use it on the hunt. A spotting scope you deploy twice a day earns its weight. A second tripod or backup binoculars don't.
Run it honestly:
- List every piece of glass and support gear with its weight.
- Estimate how many times per day you'll actually use it on this specific hunt.
- If the number is low and the weight is high, it stays home.
Carry one set of glass, one tripod, and a repair pouch. That's the whole kit. The discipline is leaving the rest behind.
If you're starting from zero and want the glass and support gear in one place, the Hunter's Optics Kit covers the rangefinder, scope, and binoculars. It's not for the hunter who already runs a matched set, it's for the one building a kit from scratch.
🛒 Shop the Hunter's Optics Kit →
Common Mistakes to Avoid When Packing Optics
The biggest mistake is burying glass in the main compartment. If reaching your binoculars means stopping, unshouldering, and unzipping, you'll glass less, and glassing is how western hunts get filled.
Three more that cost people animals:
- No lens covers. A single gritty wipe on a bare objective lens can scratch it permanently.
- One-strap tripod carry. The tripod swings, rattles, and eventually catches a branch at the worst moment.
- Skipping the repair pouch. A loose mounting screw ends a stalk. A hex key fixes it in thirty seconds.
Conclusion
Packing optics well is a discipline, not a purchase. Cover the lenses, keep the glass on your chest, balance heavy items high and centered, and carry a repair pouch that weighs almost nothing. Do that and your gear works when conditions turn.
Leash the Wilderness stocks field-tested hunting and optics gear, including the Hunter's Optics Kit with a rangefinder, rifle scope, and binoculars, plus the 20x50 Binoculars with BAK4 prisms for long-range clarity. Bundles save 20%, returns run 30 days, and shipping takes 10-20 business days.
🛒 Shop the Hunter's Optics Kit →
Get your glass sorted before the season, not during it.
Frequently Asked Questions
Should I carry my binoculars inside or outside my pack?
Carry them outside in a chest harness for quick access. Inside a pack, binoculars are slow to reach and you'll miss animals. A harness keeps them secure and ready.
How do I protect my spotting scope lens in the backcountry?
Use lens covers and a padded scope cover. When not in use, keep the eyepiece and objective lens capped. Store the scope in a protected compartment away from hard items.
What is the best way to carry a tripod while hiking?
Strap it to the side of your pack using compression straps, or use a dedicated tripod holder. Balance the weight close to your back to avoid shifting.
How do I keep my optics dry during extreme weather?
Use waterproof covers and silica gel packs in your pack. Avoid opening your pack in rain. If optics get wet, dry them with a microfiber cloth before storing.