

Table of Contents
- What You'll Need Before Starting
- Understanding Your Rifle Scope Zero at 200 Yards
- Bore Sighting Your Rifle Before Range Work
- How to Use a Laser Bore Sight for Quick Alignment
- Step-by-Step Zeroing Procedure at the Range
- Maintaining Scope Zero in Extreme Weather
- Common Mistakes to Avoid
- Frequently Asked Questions
Last Updated: September 2, 2026
What You'll Need Before Starting
Before you head to the range to zero a rifle scope at 200 yards, gather the essentials. You'll need a stable shooting platform, ammunition matched to your rifle, a target suitable for long-range work, and a way to measure bullet impact. A bench rest or sandbags will steady your rifle during shooting. A spotting scope or binoculars helps you see where rounds hit without walking downrange. A shooting mat keeps you comfortable during multiple shot groups. Finally, bring a notebook to record your adjustments and impact points, this data is critical for dialing in an accurate zero.

At Leash the Wilderness, we understand that precision optics are only as good as their zero. A rifle scope properly zeroed at 200 yards becomes the foundation for accurate shooting at distance. Whether you're hunting or shooting for accuracy, the gear you bring to the range matters. Quality optics like the 6-24x50 AO Rifle Scope with adjustable objective (AO) for parallax correction will give you the clarity needed to see your impacts clearly.
Understanding Your Rifle Scope Zero at 200 Yards
Your rifle scope zero defines where the bullet impacts relative to where the reticle points. When you zero a rifle scope at 200 yards, you're establishing the mechanical relationship between your barrel's line of sight and your scope's optical axis. This zero becomes your reference point for all shooting beyond that distance.
The reason hunters and precision shooters choose 200 yards as a zeroing distance comes down to ballistics and practical hunting ranges. Most modern hunting cartridges produce a trajectory that peaks around 100-150 yards when zeroed at 200 yards (peer-reviewed research). This creates what shooters call a "point-blank range", a distance band where the bullet stays within a few inches of your aim point without requiring holdover adjustments. For whitetail and mule deer hunting, this is ideal because most shots occur between 100 and 250 yards.
Why 200 Yards Instead of 100 Yards
Zeroing at 200 yards instead of 100 yards gives you a flatter overall trajectory for typical hunting distances. When you zero at 100 yards, your bullet will be significantly higher at 200 yards, often 4-8 inches depending on your cartridge. At 200 yards, the bullet has already begun its descent, so the trajectory arc between 100 and 300 yards remains relatively flat. This means fewer holdover calculations in the field.
The 100-yard zero was popular decades ago when ranges were shorter and ammunition less consistent. Modern hunting happens across varied terrain, and the 200-yard zero reflects realistic shooting distances. It also accounts for bullet drop more naturally, reducing the chance of a miss if your distance estimation is slightly off.
Point of Impact vs. Line of Sight
Point of impact (POI) is where your bullet actually hits the target. Line of sight (LOS) is the straight line from your eye through the scope's reticle to the target. These two don't naturally align, your barrel shoots below the line of sight because the barrel sits below the scope. Zeroing a rifle scope at 200 yards means adjusting the scope's internal mechanisms until the POI matches the LOS at that distance.
The mechanical offset between barrel and scope is typically 1.5 to 2 inches. Your scope's turrets allow you to shift the reticle's position in the scope's optical tube. When you adjust elevation (up and down) or windage (left and right), you're moving where the reticle appears in your field of view. This shifts where the bullet impacts downrange.
Understanding this relationship prevents confusion during zeroing. If your shots group 3 inches high at 200 yards, you don't move the rifle, you move the reticle down using the elevation turret. This makes the reticle point lower, which makes the bullet impact lower.
Bore Sighting Your Rifle Before Range Work
Bore sighting gets your scope roughly aligned with your barrel before you fire a shot. This step saves ammunition and time at the range by ensuring your first shots land somewhere near the target instead of wildly off. Many shooters skip this step and waste rounds chasing a zero that's far off target.
The traditional method involves removing your bolt, looking straight through the barrel at a distant target, and adjusting your scope until the reticle aligns with what you see through the bore. This works but requires a steady rest and good eyesight. A faster alternative is using a laser bore sight tool.
How to Use a Laser Bore Sight for Quick Alignment
A laser bore sight projects a red or green dot down your barrel, simulating bullet trajectory. You insert it into the chamber, activate the laser, and adjust your scope until the reticle centers on the laser dot at a known distance (usually 25 yards for indoor bore sighting). This takes 5-10 minutes and gets you within 2-3 inches of zero at 100 yards.
To use one, insert the laser bore sight into your rifle's chamber, chamber it as you would a round, and aim at a target or wall 25 yards away in a dim room. Activate the laser and observe where the dot appears. Adjust your scope's turrets until the reticle sits on the laser dot. The precision varies by tool quality, but a decent laser bore sight eliminates the frustration of your first three shots missing the target completely.
Many shooters recommend laser bore sighting as the fastest path to getting on paper. It's not a substitute for range zeroing, but it's an excellent preliminary step that respects your ammunition and time.
Step-by-Step Zeroing Procedure at the Range
Zeroing a rifle scope at 200 yards follows a repeatable process. Each step builds on the previous one, and skipping steps leads to frustration and wasted ammunition. The goal is to fire tight groups and adjust based on where those groups land relative to your aim point.
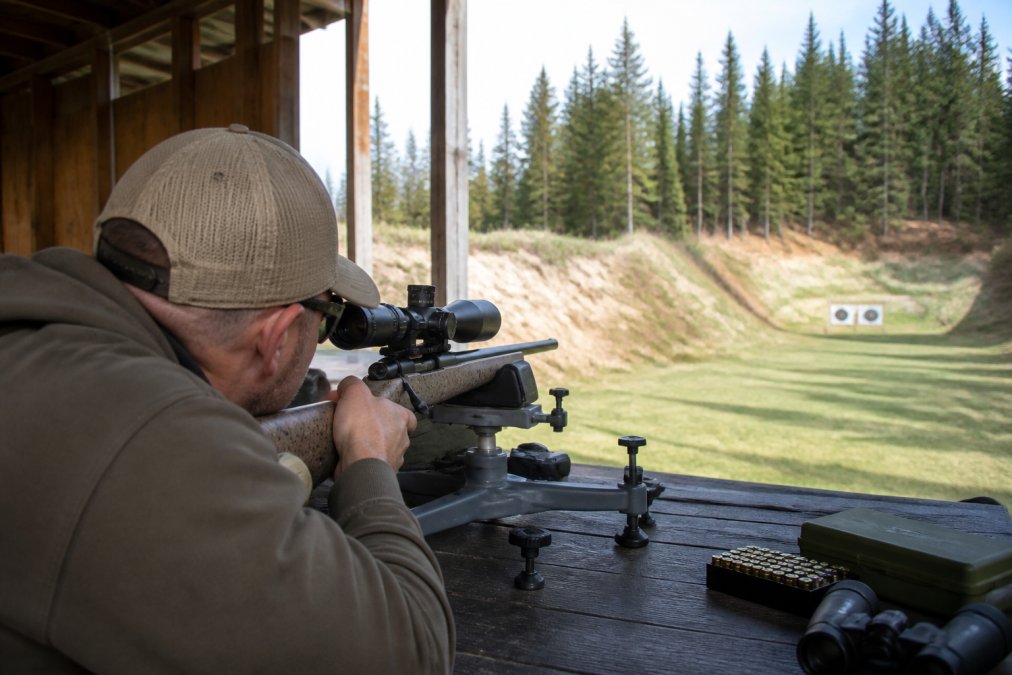
Step 1: Establish a Stable Shooting Position
Your shooting position determines whether your groups are tight or scattered. A bench rest is ideal, it removes shooter error and lets you focus on the rifle's performance. If you don't have a bench, use sandbags to support the foregrip and rear of the stock. Your body should be relaxed, not tense. Tension in your shoulders and arms translates to inconsistent trigger press and poor groups.
Position yourself so the rifle naturally points at the target without muscular effort. Your cheek should rest consistently on the stock, this is called your "cheek weld." Consistency here is critical because even small changes in cheek position shift your point of impact. Your trigger finger should press straight back without disturbing the rifle. Many shooters practice dry-firing (without ammunition) to develop a smooth trigger press that doesn't move the gun.
Step 2: Fire Your First Group and Measure Impact
Fire three to five shots at the same point of aim. Don't adjust anything yet. These shots show you where the rifle is currently shooting relative to your aim point. Use a spotting scope to observe impacts without walking downrange. Mark each impact on your target or use a fresh target for each group.
Measure the distance from your aim point to the center of your group. If the group is 6 inches high and 2 inches right, you need to adjust down 6 inches and left 2 inches. Write this down. Precision measurement prevents wasted shots on subsequent groups. A ruler or measuring device designed for target use makes this easier than eyeballing distances.
Step 3: Adjust Scope Turrets Using MOA or MRAD
Most hunting scopes use minute of angle (MOA) adjustments. One MOA equals approximately 1 inch at 100 yards, 2 inches at 200 yards, and 3 inches at 300 yards (nra.org). If your group is 6 inches high at 200 yards, you need 3 MOA of downward adjustment (since 3 MOA equals 6 inches at 200 yards).
Locate your elevation turret, it's usually on top of the scope. Turn it downward (toward the minus mark if visible) 3 clicks if your scope uses 1/4 MOA per click, or 6 clicks if it uses 1/8 MOA per click. Check your scope's manual for click value. Similarly, adjust windage (the side turret) for left-right corrections. Turn the windage turret left if you need to move impacts left, right if you need to move them right.
Some modern scopes use milliradian (MRAD) adjustments instead of MOA. One MRAD equals approximately 3.6 inches at 100 yards, 7.2 inches at 200 yards. The math is slightly different, but the principle is identical, measure your group's offset and adjust the turrets accordingly.

Step 4: Confirm Zero with a Second Group
Fire another group of three to five shots after your turret adjustments. This group should be much closer to your aim point than the first. Measure the offset again. If you're within 1 inch of the aim point, you're effectively zeroed for practical hunting purposes. If you're still off, make smaller adjustments and fire another group.
Some shooters prefer to be dead-center at 200 yards. Others accept being 0.5 inches high, which gives them a slight advantage if their distance estimation is off at slightly closer ranges. The choice is personal, but consistency matters more than perfection. A zero that you understand and trust is better than a mathematically perfect zero you're uncertain about.
Maintaining Scope Zero in Extreme Weather
Extreme temperature swings, heavy rain, and snow can shift your scope's zero if the scope isn't properly sealed or if mechanical components loosen. A quality scope with good sealing holds zero through weather changes, but cheaper optics sometimes drift.
Store your rifle in a consistent environment when possible. Avoid rapid temperature changes, going from a cold truck to a warm house can cause condensation inside the scope if it's not properly sealed. Quality scopes use multi-coated optics and sealed turrets to prevent this.
Before hunting season, check your zero at the range after significant weather or after your rifle has been stored for a month or more. A quick three-shot group confirms that your zero hasn't shifted. If it has, you'll catch the problem before the hunt, not in the field.
Common Mistakes to Avoid
The most common mistake is adjusting the rifle instead of the scope. New shooters sometimes move the rifle on the rest when they should be turning turrets. The rifle should stay perfectly still while you adjust the scope. If the rifle moves, you lose your baseline for the next group.
Another mistake is not recording adjustments. You fire a group, adjust the turrets, fire another group, but you've lost track of how many clicks you've turned. Write down every adjustment. A simple notebook entry, "Shot 1: 6 inches high, 2 inches right. Adjusted down 3 MOA, right 1 MOA", prevents confusion.
Firing only two shots per group is risky. Two shots can align by chance. Three shots show a pattern. Five shots show consistency. Always fire at least three shots before making adjustments.
Rushing the process causes errors. Zeroing takes time. Budget at least two hours at the range for a proper zero. Hurrying leads to sloppy measurements, poor shooting position, and a zero you don't trust.
Finally, some shooters zero at 100 yards and assume the scope is ready for 200-yard hunting. The zero shifts as distance changes. Always zero at the distance where you'll actually shoot. If most of your hunting happens at 200+ yards, zero at 200 yards.
Zeroing a rifle scope at 200 yards is a skill that improves with practice, but the fundamentals remain constant: stable position, careful measurement, precise turret adjustment, and verification. When you take time to do it right, your scope becomes an extension of your rifle, and your shooting becomes predictable and accurate. Leash the Wilderness carries quality rifle scopes like the 4-16X40 AOE Optics Hunting Riflescope with reliable turret adjustments and parallax correction that make zeroing straightforward. Get your scope zeroed properly, and you'll hunt with confidence knowing exactly where your bullet will go.

Frequently Asked Questions
Q: Is a 200-yard zero better than a 100-yard zero for hunting?
A: A 200-yard zero works well for most hunting scenarios because it reduces the need for holdover adjustments on common hunting distances. At 100 yards, your bullet may strike slightly high; at 200 yards, it's at the point of impact. Beyond 200 yards, bullet drop becomes significant and requires holdover or scope adjustment. For whitetail and similar game, a 200-yard zero balances point-blank range with mid-range accuracy, making it more forgiving than a 100-yard setup across typical hunting distances.
Q: How do I calculate bullet drop for a 200-yard zero?
A: Bullet drop depends on your cartridge, muzzle velocity, and ballistic coefficient. Most modern hunting rounds (like .308 Winchester or .270 Winchester) drop 8-15 inches at 300 yards when zeroed at 200 yards. Use load data from ammunition manufacturers or ballistic calculators that factor in your specific ammunition and scope height. Understanding your ammunition's ballistic coefficient helps predict drop at extended ranges, which is critical for ethical shot placement beyond your zero distance.
Q: What is the point-blank range of a 200-yard zero?
A: Point-blank range is the distance where your bullet stays within a vital zone (typically 6 inches for hunting) without holdover. With a 200-yard zero, most hunting cartridges maintain point-blank range from 0 to roughly 250-280 yards, depending on the load and game size. This means you can aim directly at your target from close range to beyond 200 yards without adjusting your scope, making it practical for field hunting where distance estimation can be imprecise.
Q: Can I sight in my rifle at 100 yards and adjust for 200 yards later?
A: Yes, you can start at 100 yards if your range is limited. Fire a tight group at 100 yards, then calculate the adjustment needed to move that group to your 200-yard impact point. Most scopes use minute of angle (MOA) adjustments; a rough rule is that 1 MOA equals 1 inch at 100 yards and 2 inches at 200 yards. However, verifying your final zero at the actual 200-yard distance is essential because wind, parallax, and scope behavior may differ, so always confirm with live fire at your intended zero distance.
This article was written using GrandRanker